Cupcake Decorating 101: Simple Frosting Techniques for Stunning Results
You’ve mastered the fluffy cupcake and baked the perfect batch—now comes the fun part: decorating! Achieving that bakery-quality look doesn’t require a professional pastry diploma. All you need are a few basic tools, the right frosting consistency, and three simple techniques.
This guide will walk you through the essentials to ensure your cupcakes are not just delicious, but visually stunning.
1. The Foundation: Perfect Frosting Consistency
Before you even touch a piping bag, the success of your decoration hinges on your buttercream consistency. If your frosting is too stiff, it will tear the cupcake liner; if it’s too soft, your beautiful peaks will melt and droop.
- Test for Stability: Your frosting should be smooth and firm enough to hold a clean peak when lifted with a spatula, but still easily push through a piping tip.
- Too Stiff? Add a small splash (about a half teaspoon at a time) of milk or heavy cream and mix until smooth.
- Too Soft? Add a tablespoon of powdered sugar and mix again until the desired firmness is achieved.
- Tip: Always beat your finished frosting on low speed for a minute or two to eliminate any large air bubbles; this prevents gaps and craters in your piped design.
2. Stunning Piping Techniques (The Essential Trio)
Once your frosting is ready, load a large piping bag (fitted with the appropriate tip) about two-thirds full. Twist the top closed and apply even pressure with your dominant hand.
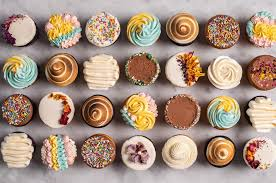
Technique A: The Classic Swirl (The 1M Tip)
This is the most common and impressive technique, perfect for beginners. You only need the Wilton 1M star tip (a large, open star tip).
- Start in the Center: Hold the piping bag straight up, about half an inch above the cupcake.
- Go Out, Then Up: Start applying pressure and pipe a tight, flat spiral on the outer edge of the cupcake, moving inward.
- Finish the Peak: Once you reach the center, continue the spiral upwards, building a second layer right on top of the first.
- Stop: Release pressure and pull the bag straight up to create a dramatic peak.
Technique B: The Easy Rosette (Star Tip)
The rosette makes every cupcake look elegant and is incredibly simple. It requires an open or closed star tip (like the Wilton 2D or 1M).
- Start at the Edge: Start piping on the outer edge of the cupcake.
- Pipe a Spiral: Pipe one single, continuous spiral moving inward, like an ice cream cone twist lying flat on the surface.
- Finish: As you reach the center, release the pressure. This single, large spiral creates the beautiful look of a rose.
Technique C: The Star Drop (Small Star Tips)
This technique uses small bursts of frosting to create a fluffy, textured look. Use any small or medium star tip (like the Wilton 18 or 21).
- Hold Vertical: Hold the bag straight up.
- Press and Stop: Apply firm pressure until a small star forms. Stop the pressure and quickly pull the bag straight up.
- Repeat: Cover the entire surface of the cupcake by repeating these small star drops, placing them tightly together to eliminate any visible cake underneath.
3. Beyond Piping: Finishing Touches
If piping isn’t your speed, or if you simply want a modern, rustic look, these finishing touches are the easiest way to elevate your treats.
- The Simple Swoosh: Use an offset spatula to spread a generous, flat layer of frosting. Then, create one or two graceful swooshes with the edge of the spatula for an artful, rustic finish.
- Strategic Sprinkles: Instead of dipping the entire cupcake (which can get messy), pour a small amount of sprinkles into your non-dominant hand and gently press them onto the sides or base of a piped swirl.
- Single, Elegant Garnish: Place a single piece of fresh fruit (like a perfect raspberry), a curl of lemon zest, a small chocolate shard, or a mini cookie on top of your finished piping or swoosh. This small detail adds huge impact.
By practicing these few techniques, you’ll quickly find that decorating is just as rewarding as baking!
Post Comment